Installation Method Statement Reefer Rack and Passage Canopy Accessories Belgium Antwerp
2024/5/23 view:
Installation Method Statement Reefer Rack and Passage Canopy Accessories Belgium Antwerp
Version 01: Date: May 22,2024

General Statement
Part 1: SN-1: Big Ramp
Part 2: SN-2,3,4,5: Various Canopies between Reefer Containers
Part 3: SN-6&7: Small Ramps and Platforms
Part 4: SN-8: Big Canopy Shed
Part 5: Conclusion of GRP Panel Cutting Plan
Part 6: Erection Bolts Installation Guidance:

The followings are the detail list of all materials for accessories of Belgium Antwerp Reefer Rack and Passage Canopies:

Description: Total 7 Units, including Ramp and handrails at both sides, installation drawings as per below:
1.1. Installation Location:
1.2. Erection Drawing:
Big Ramp Frame Work Installation Drawings
1.3.GRP Grating Panel Installation Sequence(Refer to drawing above) :
GRP Specification: 38x38x38x7mm(Green)
Item GSB-1
x 3 Pieces GSB-3
X 1 Piece
1220x1800(Ramp Width) 633x1800(Ramp Width)
Notes: The GRP panel gap considered to be 10mm in our design, unless noted otherwise, should be adjusted at site by installation party.
Dwg. PSA-004-587


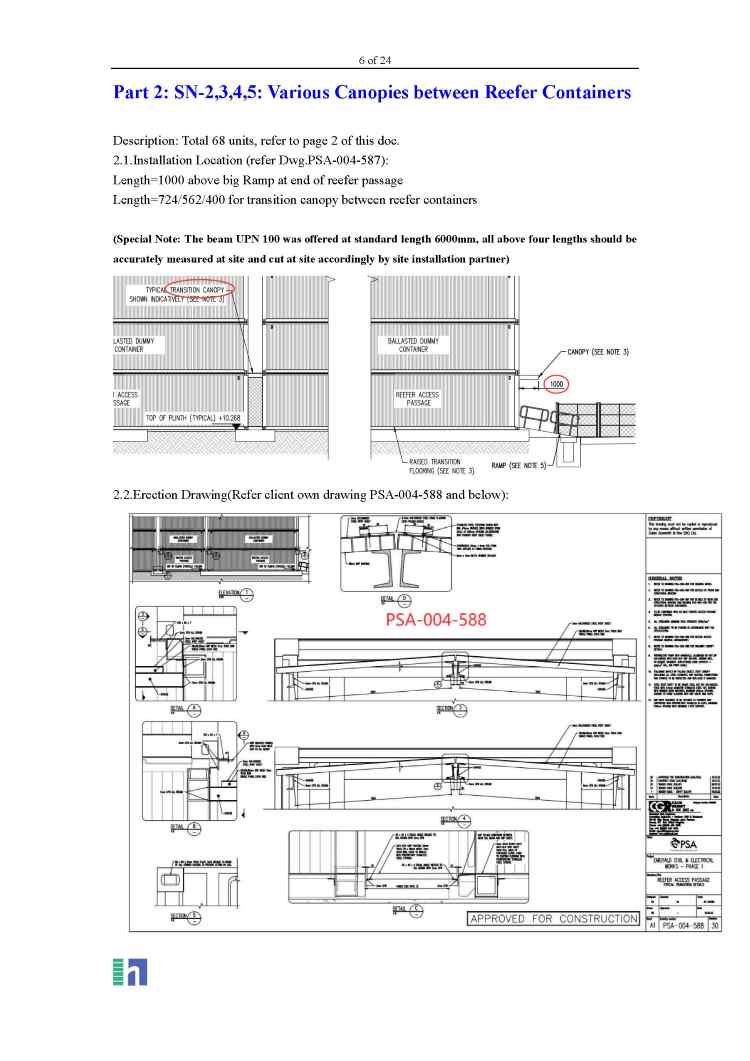
Description: Total 68 units, refer to page 2 of this doc.
2.1.Installation Location (refer Dwg.PSA-004-587):
Length=1000 above big Ramp at end of reefer passage
Length=724/562/400 for transition canopy between reefer containers
(Special Note: The beam UPN 100 was offered at standard length 6000mm, all above four lengths should be accurately measured at site and cut at site accordingly by site installation partner)
2.2.Erection Drawing(Refer client own drawing PSA-004-588 and below):
Canopy Installation Details
2.3. GRP Grating Panel Installation Sequence(Refer to drawing above) :
GRP Specification: 38x38x38x7mm(Green)
Location Spec Material Quantity LengthxWidth(*)
1000 canopy GRP 38x38x38x7 8x2=16Pcs 1220x1000
724 canopy GRP 38x38x38x7 20x2=40Pcs 1220x704
562 canopy GRP 38x38x38x7 25x2=50Pcs 1220x542
400 canopy GRP 38x38x38x7 15x2=30Pcs 1220x380
Total 136Pcs
Attention: The width(*) here is =L-20mm for theoretical calculation purpose only, the site installation partner should decide the final figures themselves.
2.4. 3mm GI Sheet Specification(Refer to drawing above) ::
Location Spec Material Quantity LengthxWidth(*)
1000 canopy 3mm GI Sheet S235JR 8x2=16Pcs 1220x1000
724 canopy 3mm GI Sheet S235JR 20x2=40Pcs 1220x704
562 canopy 3mm GI Sheet S235JR 25x2=50Pcs 1220x542
400 canopy 3mm GI Sheet S235JR 15x2=30Pcs 1220x380
Total 136Pcs
Attention: The width(*) here is =L-20mm for theoretical calculation purpose only, the site installation partner should decide the final figures themselves.
2.5.Canopy Roof Ridge Top Flashing Details:
2.6.Tansition Location Floor Slab Details(PSA-004-588 Det-C)
(Special Note: The angle L45x45x4 was offered at standard length 6000mm, all above lengths/width of angle steel and GRP gratings should be accurately measured at site and cut at site accordingly by site installation partner)


Description: Total 45 units, refer to page 2 of this doc.
Platform Channels 1382mm and 2300mm
Small Ramp Frame
2.1.Installation Location (refer Dwg.PSA-004-592 Floor plan):
(Refer to PSA-004-596)
2.3. GRP Grating Panel Installation Sequence(Refer to drawing above) :
GRP Specification: 38x38x38x7mm(Green)
Location Spec Material Quantity LengthxWidth(*)
Ramp/canopy GRP 38x38x38x7 (22*2+23*1)=67Pcs 1220x1500
Total 67Pcs
Attention:
(1)The GRP grating panel gap was considered to be 10mm in our calculation, may be subject to site final measurement and decision.
(2)For any final gap between concrete floor and the 38mm thick GRP, please use the concrete motor to finish properly for better walking result;
GRP Panel Pavement Plan


4.2. Description: Quantity: 1 Shed Only
(3D Isometric View)
Anchor Bolt Size and Spec: 6xM16 Gr.8.8 HDG
(Canopy Column Layout and Section View)
(Big Canopy Roof Beam Layout)
4.3. GRP Grating Panel Installation Sequence(Refer to drawing above) :
GRP Specification: 38x38x38x7mm(Green)
Location Spec Material Quantity LengthxWidth(*)
2660mm GRP 38x38x38x7 2Pcs 1220x2660
2000mm GRP 38x38x38x7 3Pcs 1220x2000
Total 5Pcs
4.4. 3mm GI Sheet Specification(Refer to drawing above) ::
Location Spec Material Quantity LengthxWidth(*)
No.1 3mm GI Sheet S235JR 2Pcs 1000x2660
No.1 3mm GI Sheet S235JR 1Pcs 1000x2660
No.1 3mm GI Sheet S235JR 3Pcs 1000x2000
Total 6Pcs
Attention:
4.5.Canopy Roof Ridge Top Flashing Details:


5.1. General Notes: The GRP panel specification is 38x38x38x7 standard size 3660x1220mm, The total delivered quantity is 90 pieces. The site installation partner should carry out the cutting work as per the following schedule:
Cutting Photo for reference: accurate method Cutting Photo for reference: single method
Cutting Photo for reference: accurate method Cutting Photo for reference: single method
5.2. GRP Panel Installation Location, Size and Quantity
Very Important Notes for Attention:
a. all above lengths should be accurately measured at site and cut at site accordingly by site installation partner, subject to site adjustment, if necessary
b. for the 724,562,400 canopy, the length we indicated here are just for theoretical calculation purpose only, actually they include half quantity for canopy, half quantity for floor, both these two items length may be different subject to site actual measurement and requirement, site installation partner don’t need to follow strictly these three figures of 724/562/400, ADJUSTMENT IS NOT OPTIONAL BUT A MUST.
5.2. GRP Panel Cutting Length Conclusion:
(Principle: Because the standard width of the GRP panel is 1220, special care was taken to keep this width unchanged and play as a module width in our design and pavement of panels, so as to make the minimum site cutting work, so you will note a lot of the GRP panels in the installation plan to be accurately defined at 1220mm on basis of this purpose. We also encourage site to follow this principle. In case site installation partner thinks it’s necessary to change in special case, they can cut themselves if 1220mm is not suitable for site actual condition )
5.2. GRP Panel Cutting Schedule:
85Pcs -Common + 2Pcs -Special +3Pcs –Spare = 90 Pieces Delivered
5.2.1 Common Rule for site length cutting of GRP panels: Total 85 Pieces as per following table:
5.2.2. Special Rule: for width cutting of GRP panels: Total 2 Pieces
1800x607 1800x607
1800x607 1800x607
Cutting Schedule for this Special Piece: total 7 pieces required, So need to cut 2 pieces of standard size 3660x1220 as per above illustrated schedule.
After site GRP pavement, the following treatment should be taken for avoiding trip hazard.
Top: Site cutting to smooth the GRP and Passage Tunnel Floor Level
Bottom: Site concrete finishing to smooth the GRP and RCC floor Level.
5.3. GRP Installation Clip Details:SS304 Stainless Steeel:


Reference Pictures:
(The End)


Version 01: Date: May 22,2024
General Statement
Part 1: SN-1: Big Ramp
Part 2: SN-2,3,4,5: Various Canopies between Reefer Containers
Part 3: SN-6&7: Small Ramps and Platforms
Part 4: SN-8: Big Canopy Shed
Part 5: Conclusion of GRP Panel Cutting Plan
Part 6: Erection Bolts Installation Guidance:
The followings are the detail list of all materials for accessories of Belgium Antwerp Reefer Rack and Passage Canopies:
Description: Total 7 Units, including Ramp and handrails at both sides, installation drawings as per below:
1.1. Installation Location:
1.2. Erection Drawing:
Big Ramp Frame Work Installation Drawings
1.3.GRP Grating Panel Installation Sequence(Refer to drawing above) :
GRP Specification: 38x38x38x7mm(Green)
Item GSB-1
x 3 Pieces GSB-3
X 1 Piece
1220x1800(Ramp Width) 633x1800(Ramp Width)
Notes: The GRP panel gap considered to be 10mm in our design, unless noted otherwise, should be adjusted at site by installation party.
Dwg. PSA-004-587
(General Side Elevation View of the Ramp)
Description: Total 68 units, refer to page 2 of this doc.
2.1.Installation Location (refer Dwg.PSA-004-587):
Length=1000 above big Ramp at end of reefer passage
Length=724/562/400 for transition canopy between reefer containers
(Special Note: The beam UPN 100 was offered at standard length 6000mm, all above four lengths should be accurately measured at site and cut at site accordingly by site installation partner)
2.2.Erection Drawing(Refer client own drawing PSA-004-588 and below):
Canopy Installation Details
2.3. GRP Grating Panel Installation Sequence(Refer to drawing above) :
GRP Specification: 38x38x38x7mm(Green)
Location Spec Material Quantity LengthxWidth(*)
1000 canopy GRP 38x38x38x7 8x2=16Pcs 1220x1000
724 canopy GRP 38x38x38x7 20x2=40Pcs 1220x704
562 canopy GRP 38x38x38x7 25x2=50Pcs 1220x542
400 canopy GRP 38x38x38x7 15x2=30Pcs 1220x380
Total 136Pcs
Attention: The width(*) here is =L-20mm for theoretical calculation purpose only, the site installation partner should decide the final figures themselves.
2.4. 3mm GI Sheet Specification(Refer to drawing above) ::
Location Spec Material Quantity LengthxWidth(*)
1000 canopy 3mm GI Sheet S235JR 8x2=16Pcs 1220x1000
724 canopy 3mm GI Sheet S235JR 20x2=40Pcs 1220x704
562 canopy 3mm GI Sheet S235JR 25x2=50Pcs 1220x542
400 canopy 3mm GI Sheet S235JR 15x2=30Pcs 1220x380
Total 136Pcs
Attention: The width(*) here is =L-20mm for theoretical calculation purpose only, the site installation partner should decide the final figures themselves.
2.5.Canopy Roof Ridge Top Flashing Details:
2.6.Tansition Location Floor Slab Details(PSA-004-588 Det-C)
(Special Note: The angle L45x45x4 was offered at standard length 6000mm, all above lengths/width of angle steel and GRP gratings should be accurately measured at site and cut at site accordingly by site installation partner)
Description: Total 45 units, refer to page 2 of this doc.
Platform Channels 1382mm and 2300mm
Small Ramp Frame
2.1.Installation Location (refer Dwg.PSA-004-592 Floor plan):
(Refer to PSA-004-596)
2.3. GRP Grating Panel Installation Sequence(Refer to drawing above) :
GRP Specification: 38x38x38x7mm(Green)
Location Spec Material Quantity LengthxWidth(*)
Ramp/canopy GRP 38x38x38x7 (22*2+23*1)=67Pcs 1220x1500
Total 67Pcs
Attention:
(1)The GRP grating panel gap was considered to be 10mm in our calculation, may be subject to site final measurement and decision.
(2)For any final gap between concrete floor and the 38mm thick GRP, please use the concrete motor to finish properly for better walking result;
GRP Panel Pavement Plan
Part 4: SN-8: Big Canopy Shed
4.2. Description: Quantity: 1 Shed Only
(3D Isometric View)
Anchor Bolt Size and Spec: 6xM16 Gr.8.8 HDG
(Canopy Column Layout and Section View)
(Big Canopy Roof Beam Layout)
4.3. GRP Grating Panel Installation Sequence(Refer to drawing above) :
GRP Specification: 38x38x38x7mm(Green)
Location Spec Material Quantity LengthxWidth(*)
2660mm GRP 38x38x38x7 2Pcs 1220x2660
2000mm GRP 38x38x38x7 3Pcs 1220x2000
Total 5Pcs
4.4. 3mm GI Sheet Specification(Refer to drawing above) ::
Location Spec Material Quantity LengthxWidth(*)
No.1 3mm GI Sheet S235JR 2Pcs 1000x2660
No.1 3mm GI Sheet S235JR 1Pcs 1000x2660
No.1 3mm GI Sheet S235JR 3Pcs 1000x2000
Total 6Pcs
Attention:
4.5.Canopy Roof Ridge Top Flashing Details:
5.1. General Notes: The GRP panel specification is 38x38x38x7 standard size 3660x1220mm, The total delivered quantity is 90 pieces. The site installation partner should carry out the cutting work as per the following schedule:
Cutting Photo for reference: accurate method Cutting Photo for reference: single method
Cutting Photo for reference: accurate method Cutting Photo for reference: single method
5.2. GRP Panel Installation Location, Size and Quantity
Very Important Notes for Attention:
a. all above lengths should be accurately measured at site and cut at site accordingly by site installation partner, subject to site adjustment, if necessary
b. for the 724,562,400 canopy, the length we indicated here are just for theoretical calculation purpose only, actually they include half quantity for canopy, half quantity for floor, both these two items length may be different subject to site actual measurement and requirement, site installation partner don’t need to follow strictly these three figures of 724/562/400, ADJUSTMENT IS NOT OPTIONAL BUT A MUST.
5.2. GRP Panel Cutting Length Conclusion:
(Principle: Because the standard width of the GRP panel is 1220, special care was taken to keep this width unchanged and play as a module width in our design and pavement of panels, so as to make the minimum site cutting work, so you will note a lot of the GRP panels in the installation plan to be accurately defined at 1220mm on basis of this purpose. We also encourage site to follow this principle. In case site installation partner thinks it’s necessary to change in special case, they can cut themselves if 1220mm is not suitable for site actual condition )
5.2. GRP Panel Cutting Schedule:
85Pcs -Common + 2Pcs -Special +3Pcs –Spare = 90 Pieces Delivered
5.2.1 Common Rule for site length cutting of GRP panels: Total 85 Pieces as per following table:
5.2.2. Special Rule: for width cutting of GRP panels: Total 2 Pieces
1800x607 1800x607
1800x607 1800x607
Cutting Schedule for this Special Piece: total 7 pieces required, So need to cut 2 pieces of standard size 3660x1220 as per above illustrated schedule.
After site GRP pavement, the following treatment should be taken for avoiding trip hazard.
Top: Site cutting to smooth the GRP and Passage Tunnel Floor Level
Bottom: Site concrete finishing to smooth the GRP and RCC floor Level.
5.3. GRP Installation Clip Details:SS304 Stainless Steeel:
Part 6: Erection Bolts Installation Guidance:
Reference Pictures:
(The End)
- Pre:None
- Next:REEFER PASSAGES FOR SAFETY TUN 2024/5/22